This is the first of several articles in which I’ll show how to setup a Docker based home automation platform using a Synology NAS. Running your home automation components using Docker containers is a lightweight alternative to bare metal or virtual machine implementations. Because of this they can be ran on many devices that are limited in CPU and memory resources such as NASs used by the average home user. An advantage of using a NAS for HA is they provide a higher level of reliability and capacity for device storage compared to SBCs like the Raspberry Pi which use SD cards that are limited in capacity and prone to failure. I chose to use the Synology NAS platforms for these articles because I have been using their products for many years to provide storage and local cloud services for my home network. So, if you already have a NAS that’s running 24/7 and is capable of running a few Docker containers you’ve got the makings of a reliable HA platform.
For this project I’ll be using the Synology DS-720+ NAS which will be dedicated to home automation, but if you want to also use your NAS for storage and cloud services there are bigger models such as the DS-920+ or DS-1520+.
List of my NAS build:
Compatibility Check
The Synology Docker Package will be available to install on most NAS models with the exception of some of the entry level models. Before you start, check to make sure that it supports your specific model of NAS.
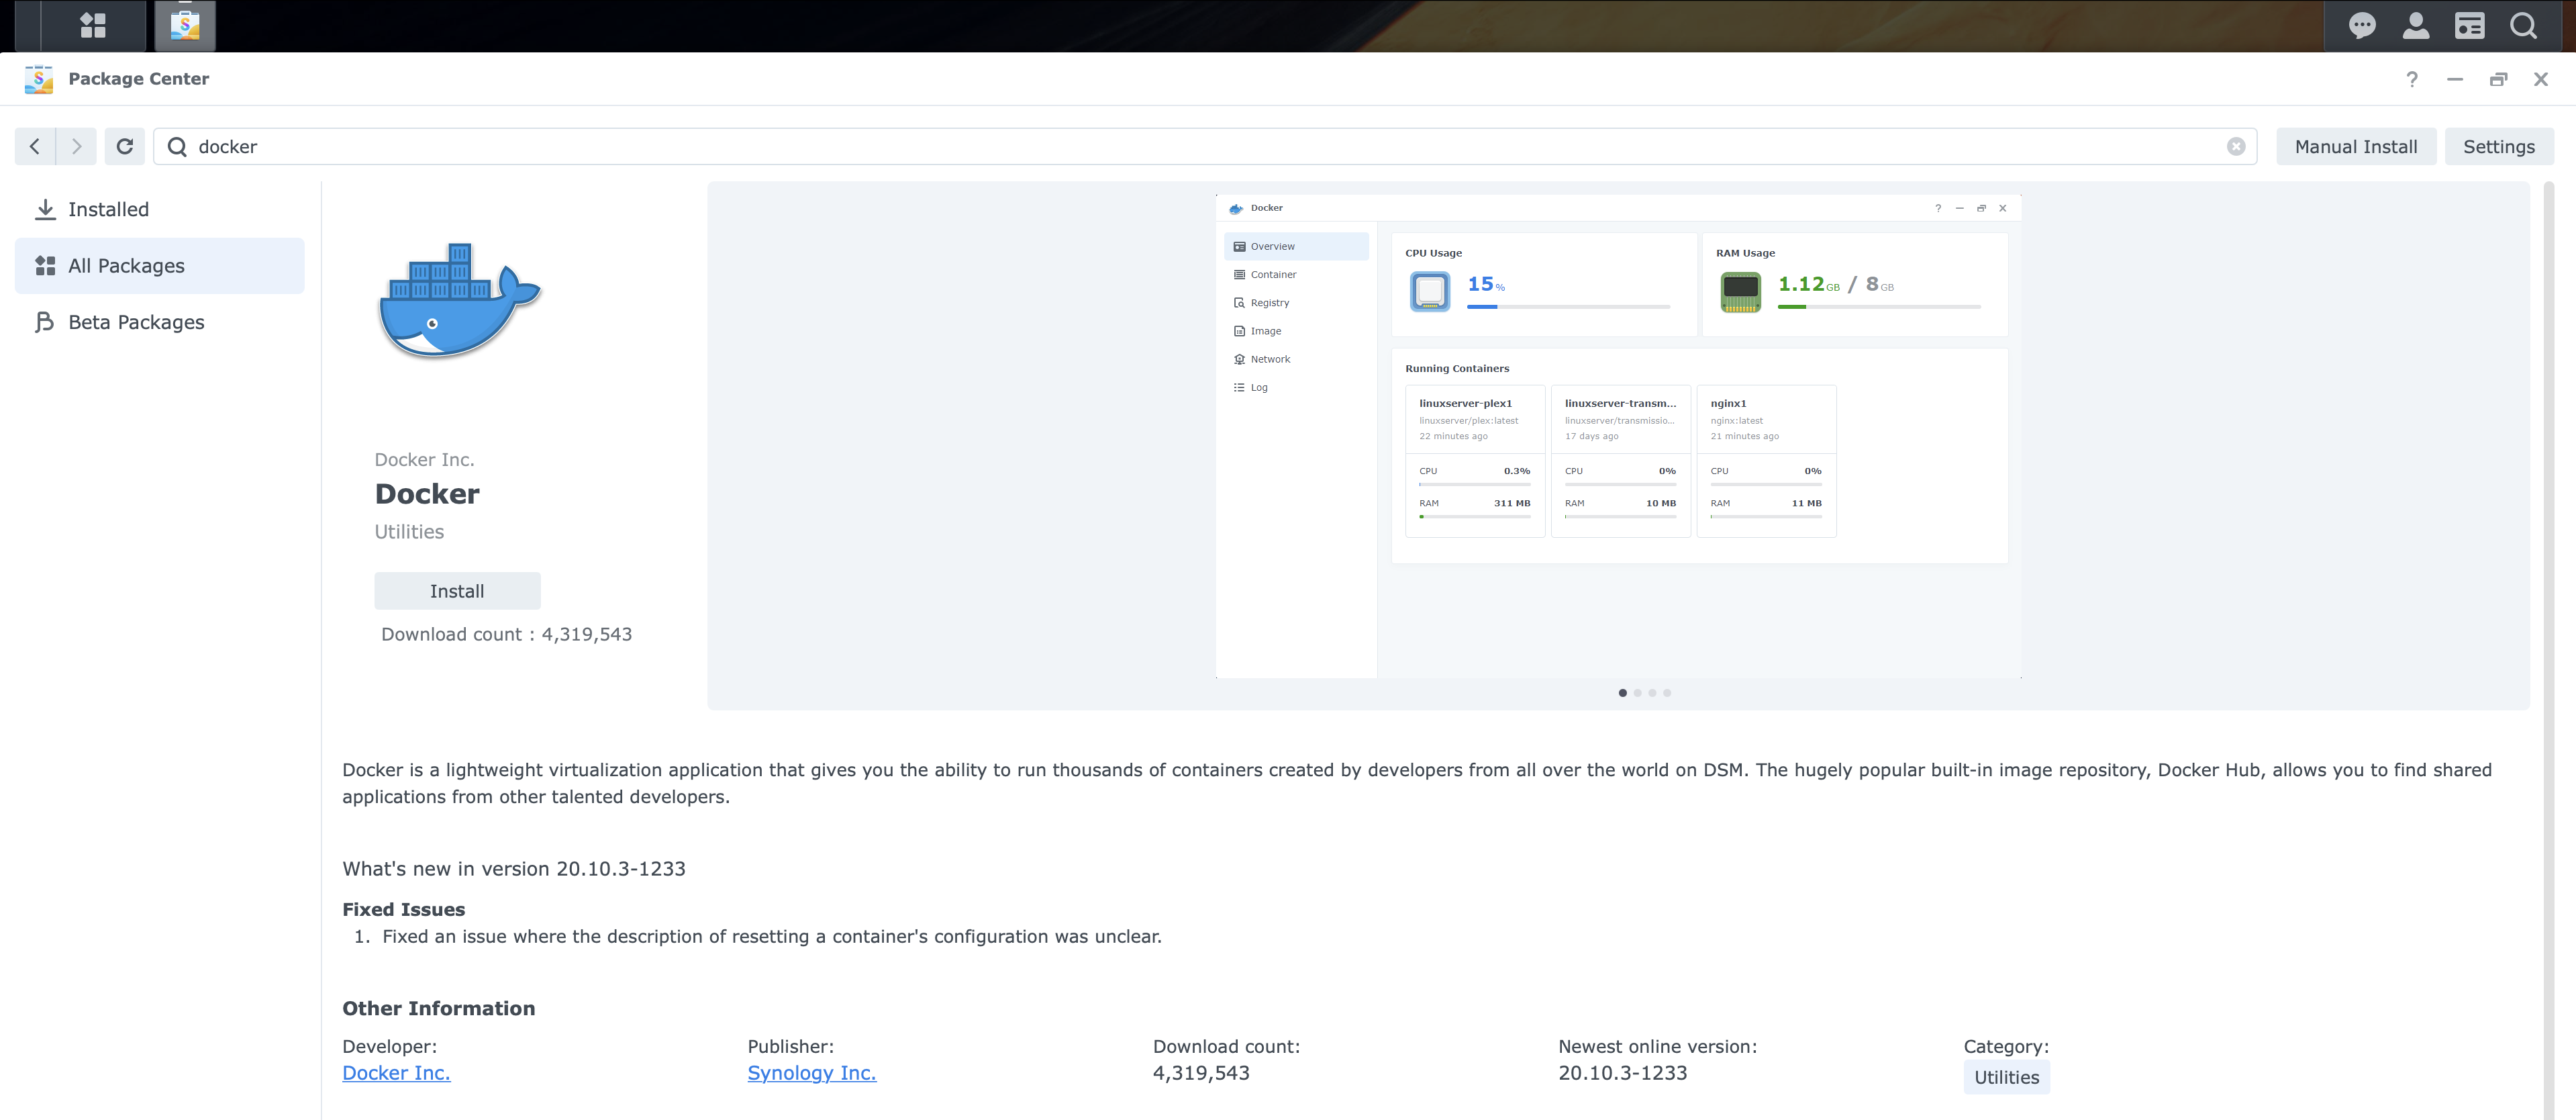
Install Docker on the Synology NAS
If your Synology model supports the Synology Docker Package then the installation process will be pretty easy. After you log into the DSM of your NAS, open the Package Center app, and either browse or use the search tab to find the docker package and then click install.
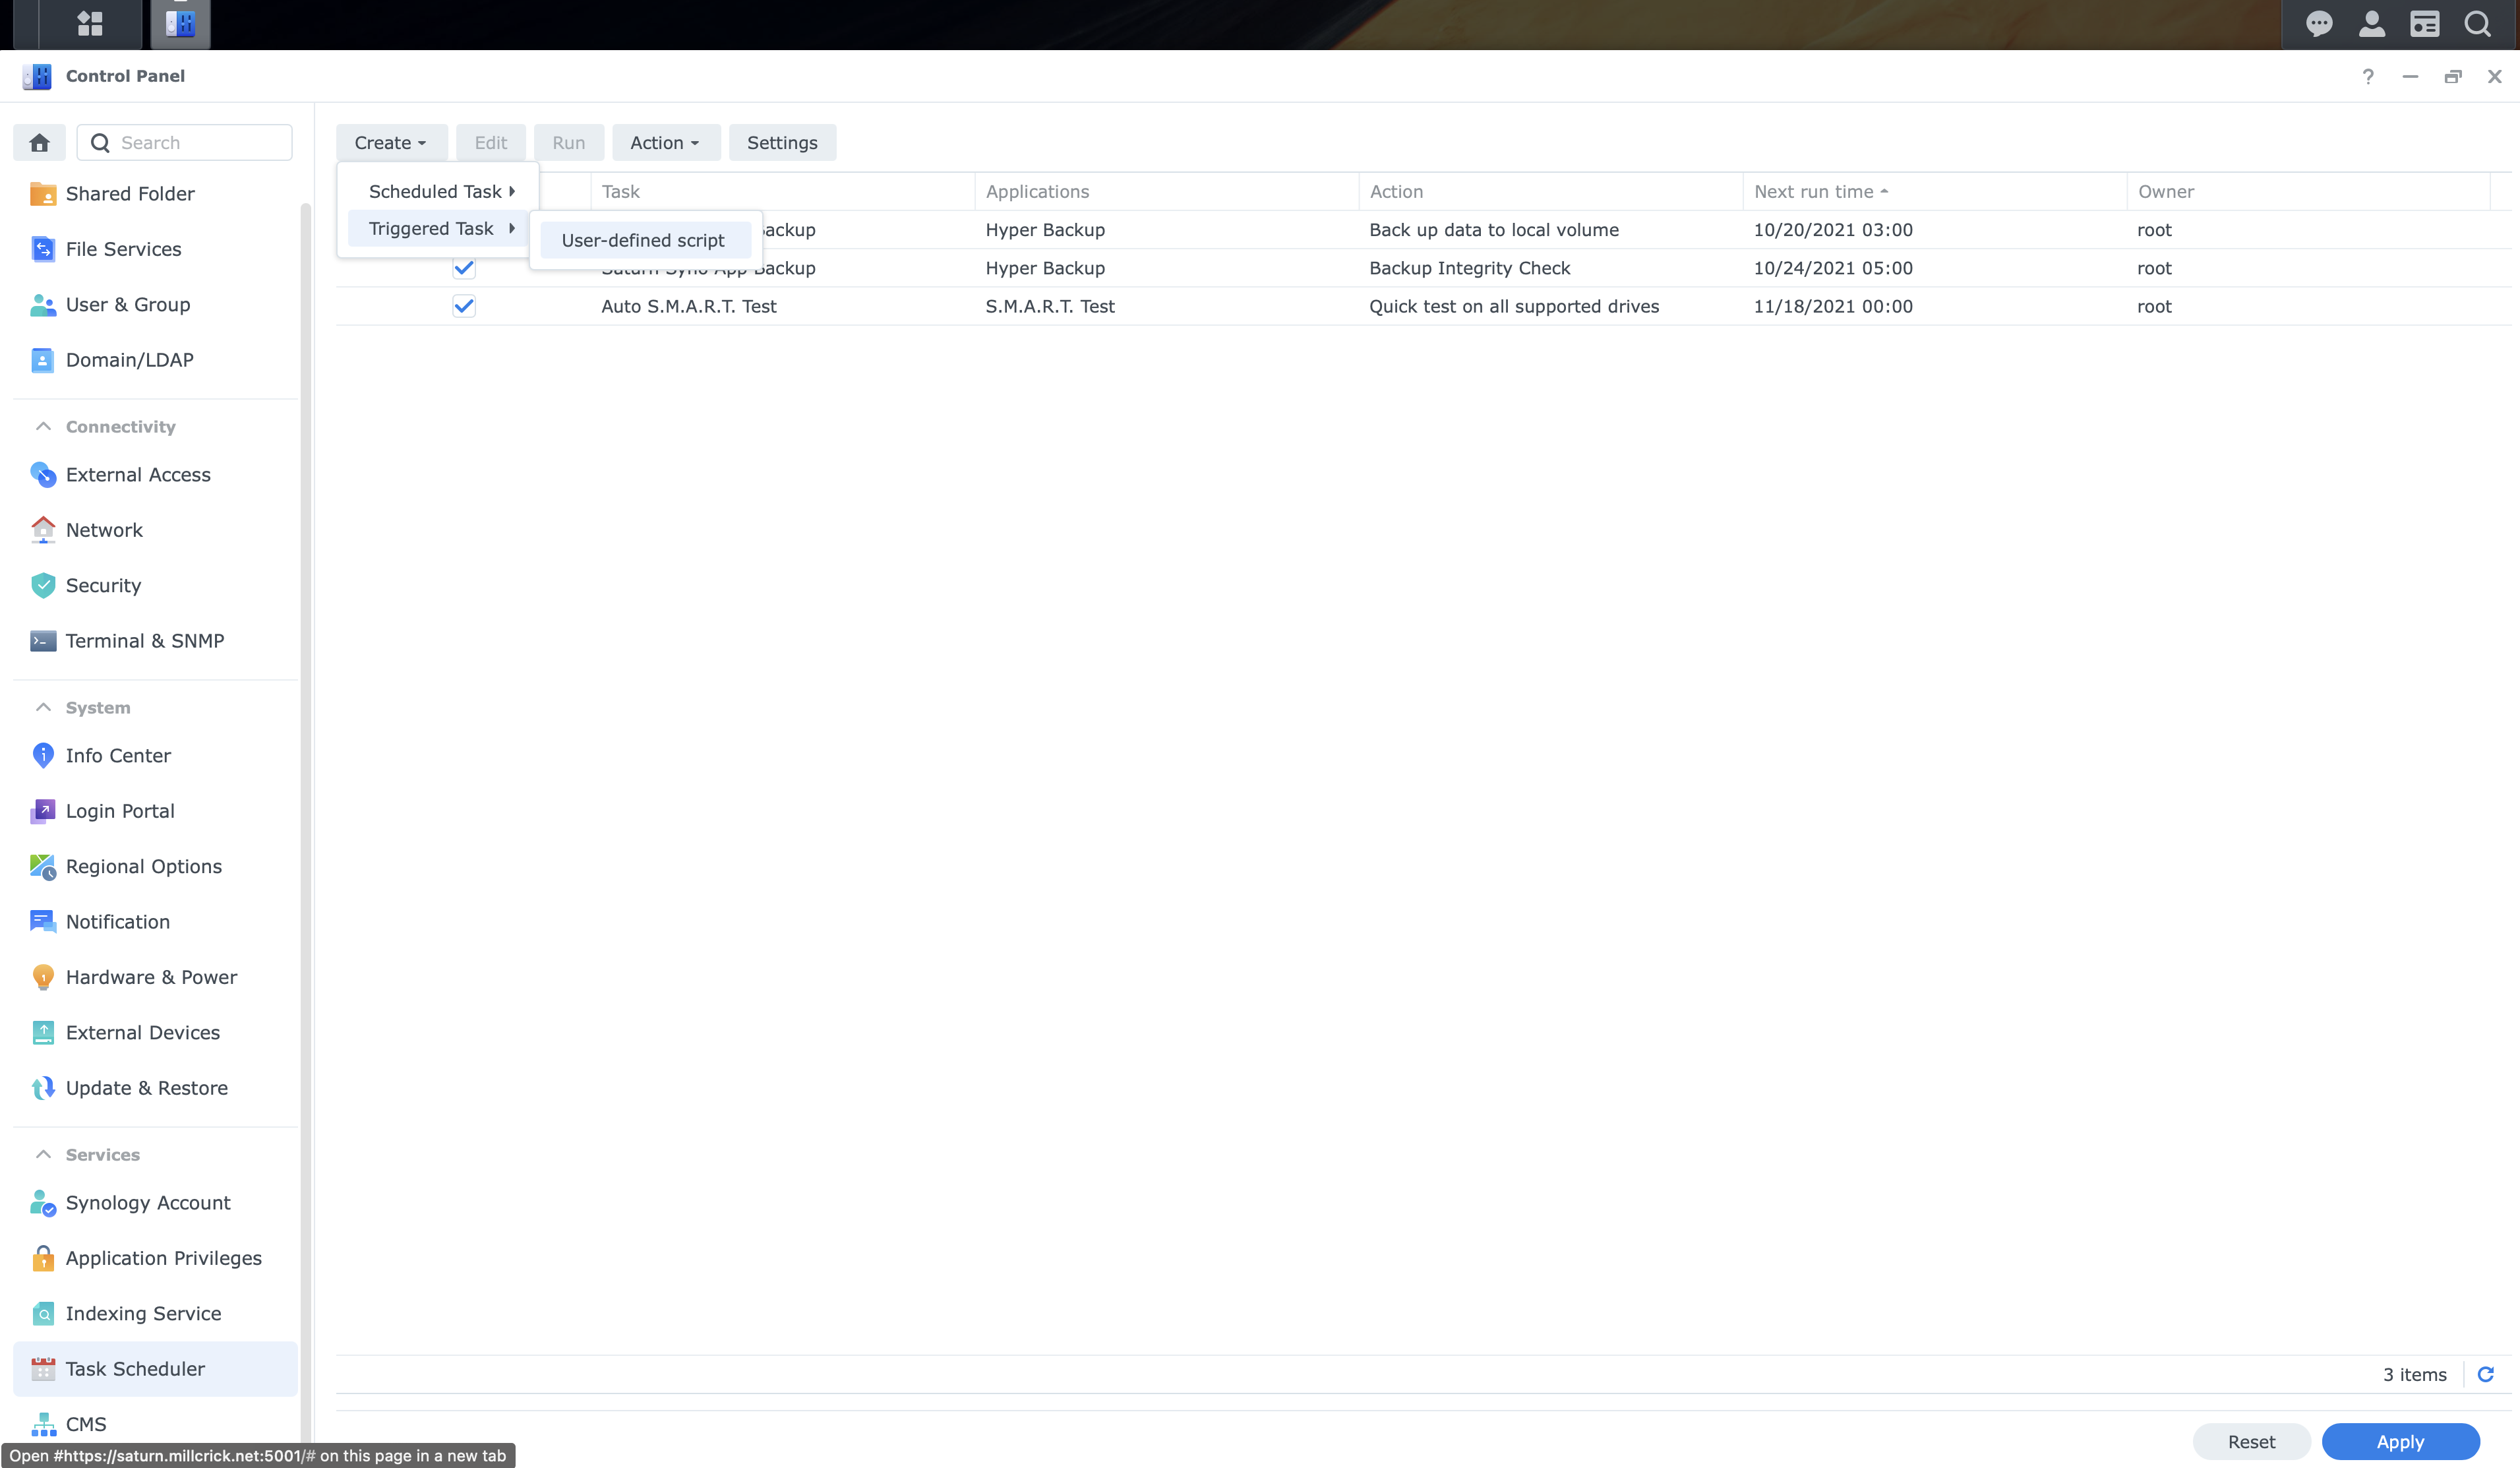
Create Boot-up Tasks
This section describes how to make the tasks that the NAS will run upon boot-up to create links on the NASs filesystem for the docker containers to use.
- link to /etc/TZ for containers to get timezone
- Link to /etc/localtime for containers that need the local time
- Link to /var/run/docker.sock for container that need to access the docker.sock service
Issues may occur when some Docker containers are started but their timezone is not the same as your local timezone. Two ways to pass the timezone to a new container is specify the timezone as an environment variable in the runtime command or to map the TZ file on the host to the one in the container. It’s usually easier to specify environment variables, but if a container does not heed them then mapping files is the last resort. So, if you do experience time related issues with a container then configuring these tasks on your NAS can help.
During the Docker package installation it has created a shared folder called “docker” on your NAS’s file system. This is where we’ll create our links for the Docker containers to use. Specifically, we’ll create links in the docker folder to the NAS’s /etc/TZ, /etc/localtime, and /var/run/docker.sock files. We have to create links because the docker containers are not allowed to access many areas of the Synology OS such as the /etc directory were these files live.
Create timezone Task
To make a task that creates our TZ (timezone) link upon NAS boot-up first login to DSM, go to Control Panel, Task Scheduler, click Create button, and select Triggered Task and User-defined script from drop down box. Populate the two config windows like so and click OK:
In the General tab enter the name of your task:

In the Task Settings tab enter the command shown in the Run Command / User-defined script box:
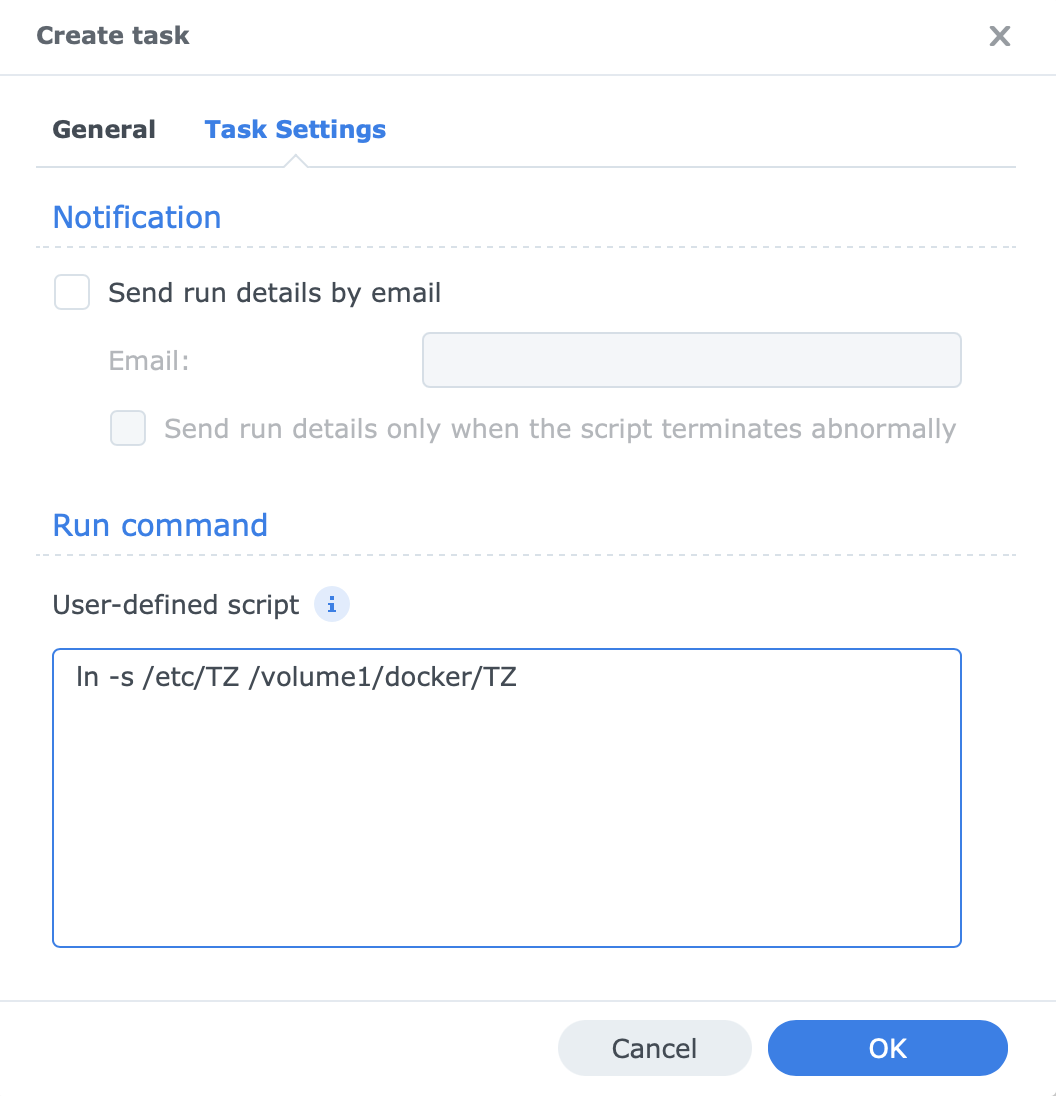
1
ln -s /etc/TZ /volume1/docker/TZ
Create local time Task
Next create another task similar to the one you just made for the timezone link (above), but instead this task will create a link for the localtime file, make the name of the Task something like “Docker localtime Link”, and use the script below:
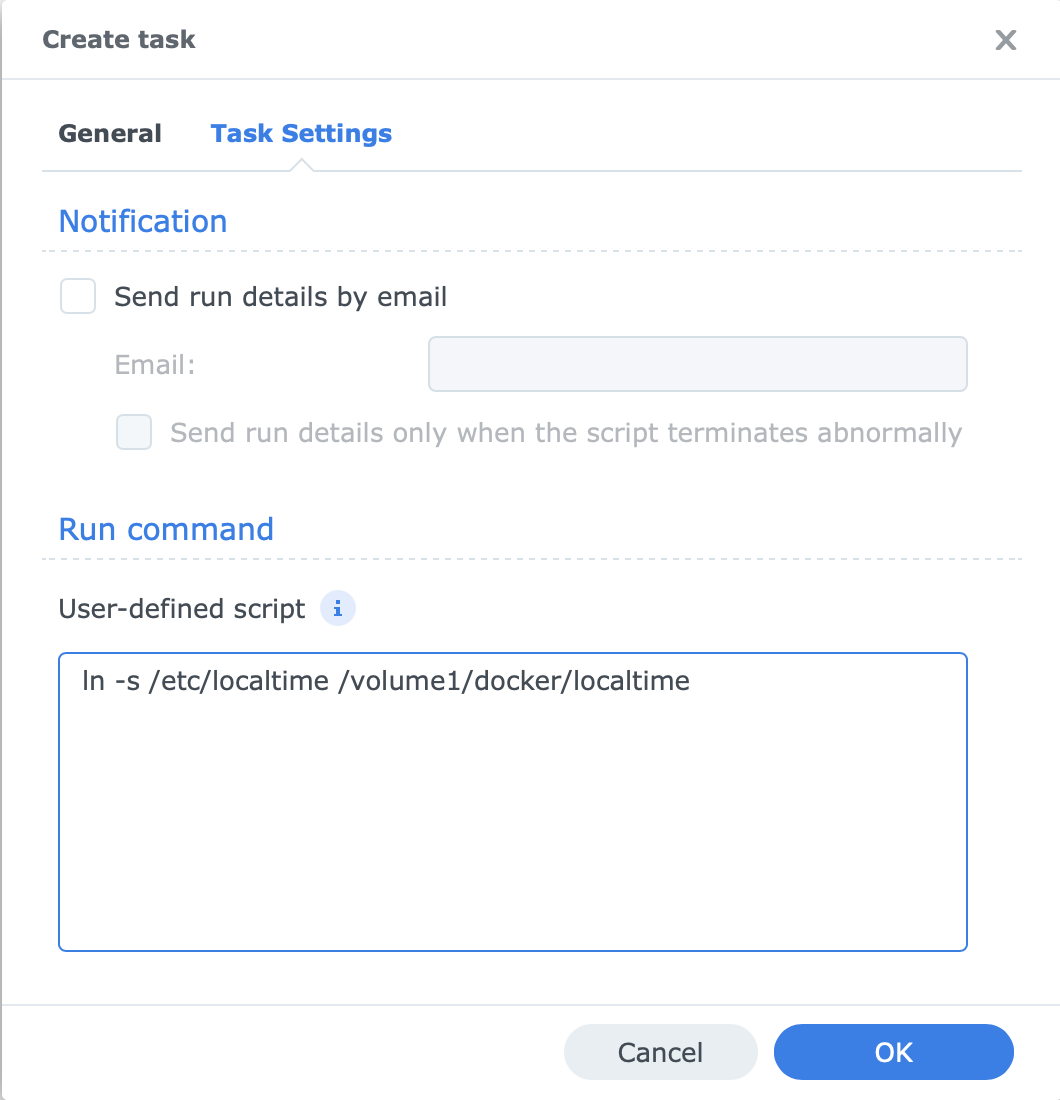
1
ln -s /etc/localtime /volume1/docker/localtime
Create docker.sock Task
And lastly create another task similiar to the previous ones, but instead this task will create a link for the /var/run/docker.sock file, make the name of the Task something like “Docker Sock”, and use the script below:

1
ln -s /var/run/docker.sock /volume1/docker/docker.sock
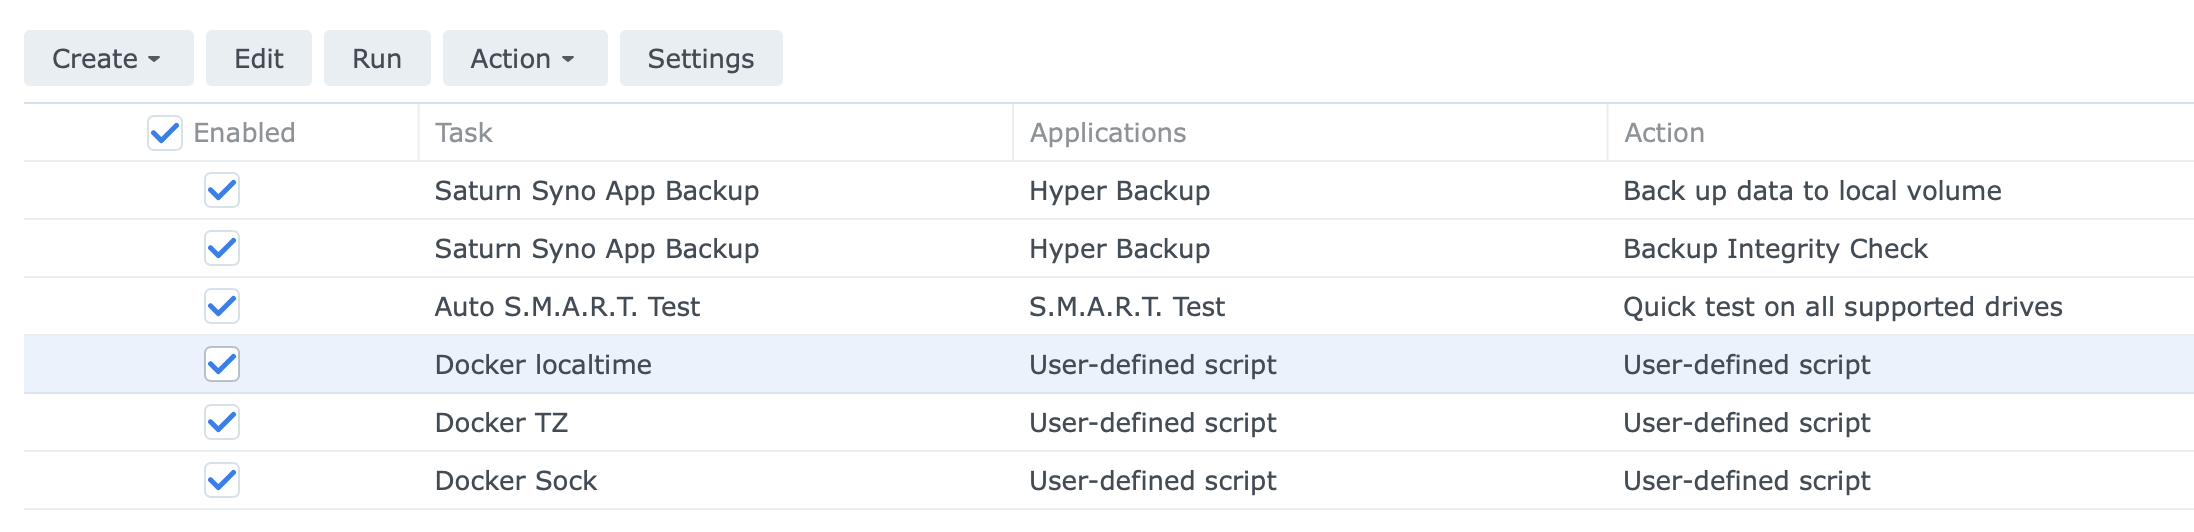
When you’re done you should see all three tasks listed in the DSM Tasks app. In order for your links to be created you can either manually run them using the Run button in the Tasks app or reboot your NAS.
Enable SSH
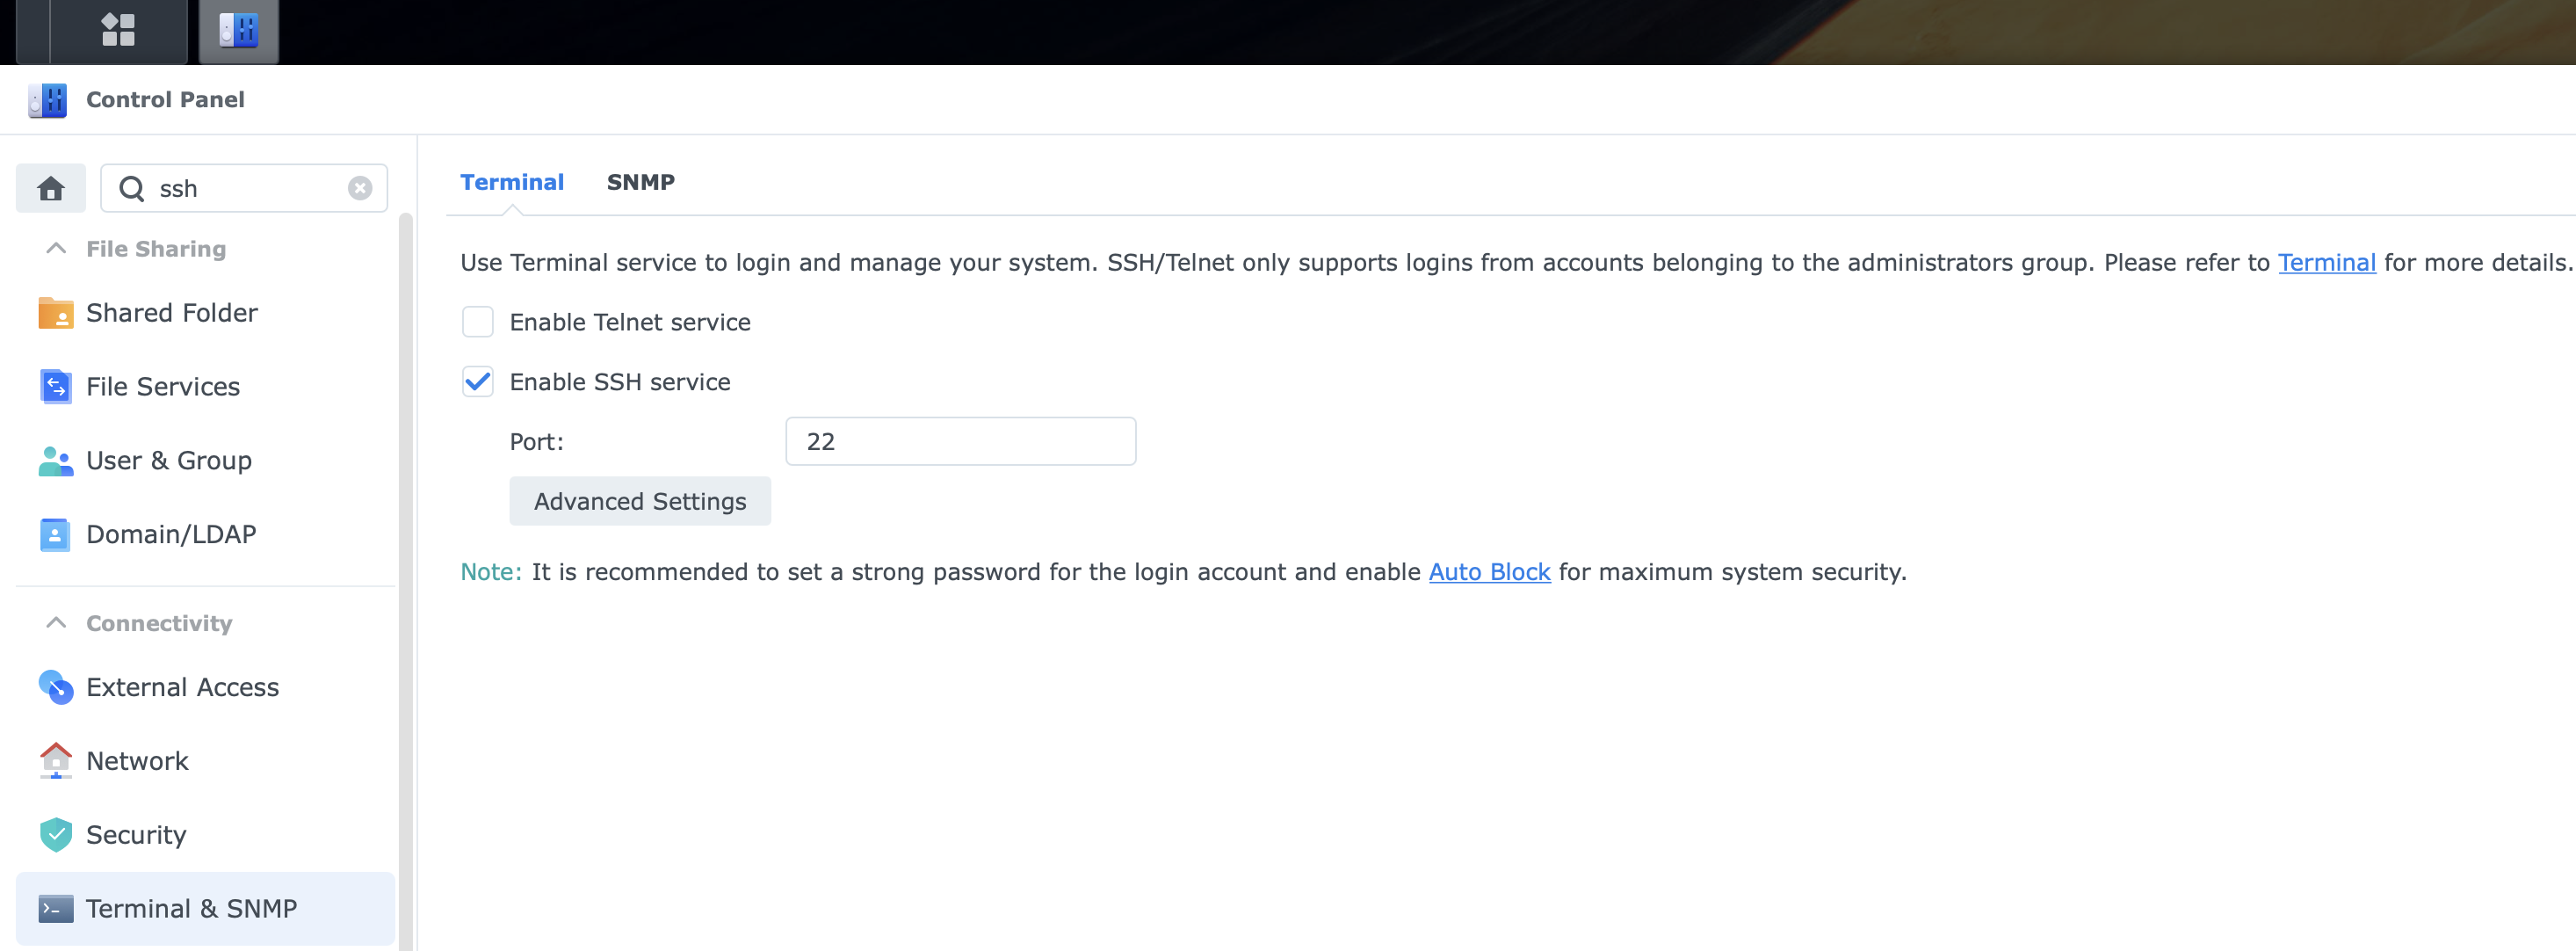
We’ll need to enable SSH on our NAS in order to install Portainer. While logged into your DSM desktop open the Control Panel app and go to Terminal & SNMP and in the terminal tab click the Enable SSH Service checkbox.
Once SSH is enabled you’ll be able to use PuTTy or WinSCP (Windows) or a terminal window (Linux or MAC) to SSH into your NAS using it’s IP address or FQDN and your admin username and password.
1
ssh admin@[YOUR_NAS_IP]
Install Portainer
This section describes how to install Portainer CE (Community Edition) on our NAS. The Synology Docker package does provide a GUI to deploy and manage Docker containers, but it’s pretty basic so I prefer to use Portainer instead. Portainer CE is free to use and provides a better UI as well as support for stacks which are a way to configure containers via YAML. Portainer itself runs as a docker container and we’ll have to ssh into our NAS and use the command line to install it.
The process and commands below are specific for installing Portainer on the Synology NAS, but for reference the official documentation for installing Portainer CE can be found here.
SSH into your NAS and enter the following command to verify docker is installed and you can run commands as super user:
1
sudo docker --version
Because we used sudo you should get a password prompt - password is the same as your admin account you used to SSH in. If the command returns the docker version you’re good to go.
Also, Portainer needs access to docker.sock so verify the tasks you created in previous step worked by listing the contents of the docker directory:
1
ls -ltr /volume1/docker
You should see the following files:
1
2
3
docker.sock -> /var/run/docker.sock
localtime -> /etc/localtime
TZ -> /etc/TZ
Next, create the volume that Portainer Server will use to store its database:
1
sudo docker volume create portainer_data
Then, download and install the Portainer Server container:
1
sudo docker run -d -p 8000:8000 -p 9443:9443 --name portainer --restart=always -v /volume1/docker/docker.sock:/var/run/docker.sock -v portainer_data:/data portainer/portainer-ce:latest
The command should return something similar to this:
1
2
3
4
5
6
7
8
Unable to find image 'portainer/portainer-ce:latest' locally
latest: Pulling from portainer/portainer-ce
7721cab3d696: Pull complete
0645e7e2a110: Pull complete
6329543ecfce: Pull complete
Digest: sha256:76ff22486bcd3713631b5f317efcb69e707a122fe96ffcc0589cf2d3e8e6b890
Status: Downloaded newer image for portainer/portainer-ce:latest
ef3c24a66422c6e04c02e9011899ace625cff8dda06a67d0536d78bd5af1b133
Now that Portainer is installed go ahead and verify it’s running by entering the docker ps command:
1
sudo docker ps
And you should see output similar to this:
1
2
CONTAINER ID   IMAGE                           COMMAND        CREATED         STATUS         PORTS                                                      NAMES
ef3c24a66422   portainer/portainer-ce:latest   "/portainer"   5 minutes ago   Up 4 minutes   0.0.0.0:8000->8000/tcp, 0.0.0.0:9443->9443/tcp, 9000/tcp   portainer
Congrats! You’ve created your first docker container! Go ahead and log into Portainer by opening your web browser and going to the URL below to start the initial setup for Portainer. By default Portainer uses a self signed certificate so you’ll likely be warned of such on your first visit.
https://[YOUR_NAS_IP]:8443
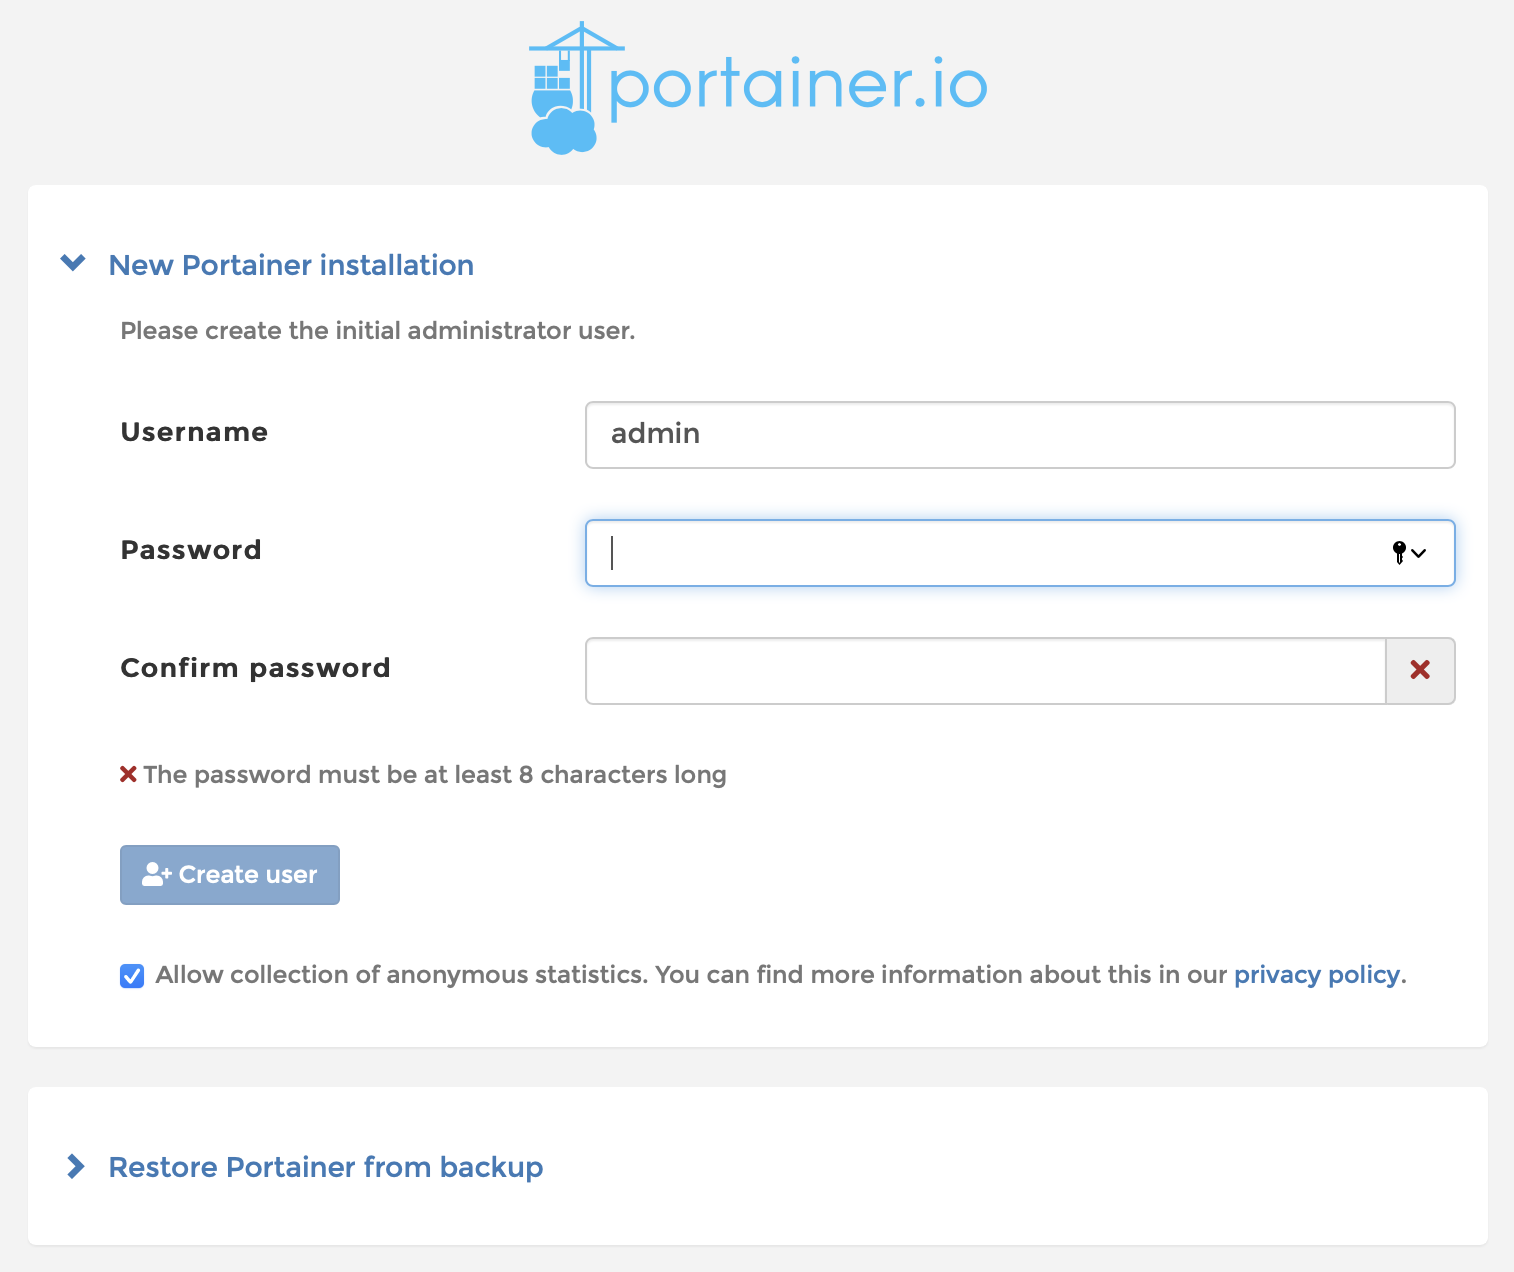
Create your Portainer admin account:
Click on “Get Started - Proceed using the local environment which Portainer is running in”
